Buttonはまさに「ボタン」なAndroidのButtonですが、単純にImageButtonのBackgroundに絵を表示させても押されたか押されてないか分からない!フォーカス当たってるのかさえ分からないよ!src設定したらButton剥き出しだしって、どうしたらいいの!
...と言う事でButtonらしくImageButtonを使う方法。
完成イメージ
ボタンイメージ
![]() 三色団子のようですが、左から...
三色団子のようですが、左から...
- フォーカスが当たってない、ボタンが押されてない
- フォーカスが当たっている、ボタンが押されてない
- ボタンが押されている
画面イメージ
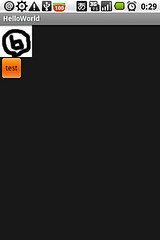
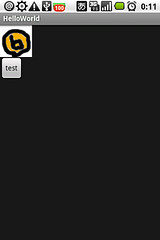
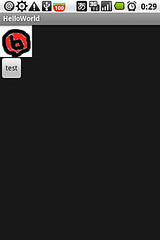 画面上にはボタンを2つ配置します。
やりかた
styleを使った少し面倒な方法ですが、説明します。
コード
最初のテンプレ通りでOK。
public class HelloWorld extends Activity {
    @Override
    public void onCreate(Bundle savedInstanceState) {
        super.onCreate(savedInstanceState);
        setContentView(R.layout.main);
    }
}
custom.xml
上から順に条件を見ていき、当てはまればタグ内の一番下の値が選ばれます。ここでは上から
- ボタンが押されたか
- ボタンにフォーカスが当たったか
- 上記2つの条件に当てはまらないか
<?xml version="1.0" encoding="utf-8"?>
<selector xmlns:android="http://schemas.android.com/apk/res/android" >
    <item
        android:state_pressed="true"
        android:drawable="@drawable/btn2"
    ></item>
    <item
        android:state_focused="true"
        android:drawable="@drawable/btn1"
    ></item>
    <item
        android:drawable="@drawable/btn0"
    ></item>
</selector>
style.xml
styleではcustom.xmlで選ばれた値がセットされます。
<?xml version="1.0" encoding="utf-8"?>
<resources>
    <style name="btn">
        <item name="android:background">@xml/custom</item>
    </style>
</resources>
main.xml
ここで重要なのはImageButtonタグ内のstyle定義だけです。
<?xml version="1.0" encoding="utf-8"?>
<LinearLayout
    xmlns:android="http://schemas.android.com/apk/res/android"
    android:orientation="vertical"
    android:layout_width="fill_parent"
    android:layout_height="fill_parent"
>
    <ImageButton
        android:id="@+id/btn"
        android:layout_width="wrap_content"
        android:layout_height="wrap_content"
        style="@style/btn"
    ></ImageButton>
    <Button
        android:text="test"
        android:layout_width="wrap_content"
        android:layout_height="wrap_content"
    ></Button>
</LinearLayout>
まとめ
これでButtonらしくフォーカスが当たってる時や、クリックされた時に変化させる事ができる!
別Widgetも似た方法で挿げ替えられるので試してみるといいですよ。